Tuesday, April 10, 2012

Failover clustering (My simple test environment)

A post two days in a row? This is some sort of record. In any case today we're going to discuss the small and not best practices friendly test environment I set up here at 3X. The reason the cluster exists is that we had to adjust the product to suit the needs of a customer who has a SQL cluster, and as such we needed a test environment with which to pound on incessantly to make sure it worked. I'll very quickly detail what went into it, and then describe how it is being backed up by 3X Appliance.

Here is a list of the things needed in order to set it up:

1. 2 VMs running Windows Server 2008 R2 Enterprise or Datacenter (Mine are datacenter)
2. 1 VM running a virtual NAS device to act as shared storage (FreeNAS for me)
3. Windows domain
4. Backup appliance

So the list of parts is pretty simple. In my instance I have a VM set up on one of our hyper-v test hosts, and another set up on my test ESXi host (I do enjoy the mixed environment). The first step I had to complete after getting the operating system set up for both VMs and getting them on the domain properly was to install the failover cluster feature. It's a straight forward process just like any other Windows Server feature install and I merely followed the wizard as it lead the way.

Now before you set up the actual cluster you have to make sure there is some sort of shared storage setup. Now Windows Server requires Persistent Reservations to be enabled on this storage so you can't use OpenFiler in order to simulate the NAS. After some digging around I did find out that FreeNAS supports said feature.You can follow the instructions here in order to set up an appliance to run the FreeNAS software (unless of course you are lucky enough to have a NAS already). And these instructions are helpful for setting up the iSCSI target you'll need to use as the shared storage. After FreeNAS is set up right you'll just need to use the Microsoft iSCSI initiator to get the LUN exposed to your VMs. You must do this on all VMs you are adding to the cluster in order for it to work properly.

Next you'll need to go into your snap in console and to the Clustering management portion in order to actually create the cluster. Again this is merely a matter of going through a few wizard windows, but as long as you have all the prerequisites set up properly you shouldn't have any trouble.Once complete you'll have a lovely two or more node cluster for your testing/enjoyment. Pay particular attention to the validation step for the wizard as it's very good at telling you all the things you forgot to do, or did wrong. One thing I should note here is that you should never use a two node cluster for production. If one of the nodes fails the whole thing goes down and you lose quorum. At minimum you should have 3 nodes for a production environment.

Now on to backing it up. Since I work at 3X and have access to their appliances I use one of them to backup the evironment. I have a SQL level and a file level backup taking place for this cluster. Now there is something critical to keep in mind if  you are using an agent based backup like ours to backup a cluster and that is the ownership of the LUN(s) you are using for shared storage. In my example I have sqlcluster01 and sqlcluster02.

As you can see from the screenshot my disk is owned by sqlcluster02. So the only way I'm going to get a file level back up of this volume is if I have the agent installed on that VM. Once this is achieved you'll see the drive show up as any other in our wizard as below:
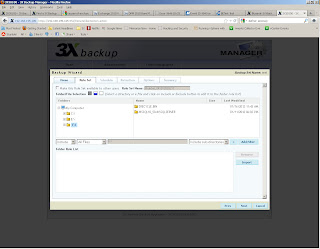


 So file level backup is pretty straight forward, but what about SQL? Well for 3X as of version 3.1.25 you can backup SQL clusters and you do so just like any other SQL instance. You just install the agent on the production node and set up a SQL job as per the instructions you can find here under Administrative Guide > Creating Backups.

That's the summary of things. I am of course always available for any feed back or questions which you can leave either in the comments or you can email me directly via the address in my signature block below.

Ryan Koch
3X Systems
ryan.koch@3x.com


Monday, April 9, 2012

Thoughts on the HP touchpad

Now I was not one of the lucky few that had caught the Touchpad when it went for 99 dollars a while back. However, I did notice fairly recently that Newegg had it refurbished for 230 (it's now a bit more expensive) (link), which really isn't bad. I ended up purchasing this tablet, mostly as a toy that I could fool around with as I wanted to installed ICS on it. As it turns out Cyanogen Mod 9 is out for it and in alpha (now officially). So, I figured I'd share a couple tips with anyone else brave enough to make this purchase and to share some opinion of its performance.

Specs:


CPU Type
    Qualcomm Snapdragon dual-core

CPU Speed
    APQ8060(1.2GHz)

Screen Size
    9.7"

Resolution
    1024 x 768

GPU/VPU
    Adreno 220

Hard Drive

HDD
    32GB Storage

Memory
    1GB

WLAN
    Dual-band Wi-Fi 802.11a/b/g/n

Bluetooth
    Bluetooth 2.1

Battery
    6300mAh (typical) lithium-polymer battery

Physical spec

Dimensions
    9.45" x 7.48" x 0.54"

Weight
    1.6 lbs


Out of the box it had WebOS installed. Having not used a device with this operating system I was actually impressed by the UI and in particular how it handled switching between running applications with its card system. The problem with it, as has been addressed by many bloggers is the complete lack of applications for it. This is a large reason why I decided to go ahead and install android next it in a dual boot fashion, as WebOS would stand as an OS I could use if I blow Android up playing with it.

The installation of Cyanogen 9 is actually pretty easy. You can follow the instructions found here. After the installation I was surprised to find that despite being in Alpha the OS ran rather well. The camera is still inoperative and there are some buggy situations you'll run into, but overall I found the tablet tolerable to use in this scenario as a normal driver. I did however run into a couple problems that required some digging around the internet to solve.

The biggest problem turned out to be charging at first. I ran into a situation where the tablet would not charge unless it was booted into WebOS. The behavior was obviously software related and so the search for a solution began. I ended up finding out that the storage options needed to be changed in order for the current build of CM 9 to charge inside android. So I went to the Settings application, then to the button on the top right for more options and hit USB computer connection. There one needs to set the device to MTP mode. The other benefit to this change is that it should let you mount the device in windows as well for getting at the internal SD card storage. The moment I made this change the behavior improved and I can now charge the device (hooray!).


Outside of that charging issue I've had a true pleasure in playing with the device. The interface is fast, and ICS is a huge improvement over earlier versions of Android. The tablet has been excellent in use for email, Teamviewer (IT type stuff), Social networks, Netflix, and really all any other tasks that you'd also complete with a smart phone. The device does feel a bit heavy, and the sleeve it comes with from Newegg is mediocre. I definitely suggest getting the HP made case for it, and if you feel like springing for it the touchstone charger as both enhance the ownership experience quite a bit. In any event if you are looking for a fairly cheap tablet with decent specs its not a bad choice if you're willing to get your hands dirty.

Ryan Koch
3X Systems
ryan.koch@3x.com

Wednesday, March 21, 2012

Exchange Maintenance

I apologize for having disappeared for a short bit. I had some military training that pulled my attention from this blog for a short time. However, jumping back into the swing I'd like to make a short note about Exchange maintenance policy. For those of you that are using a backup solution utilizing VSS to complete file backups of the information store, this is of particular importance.

I have found that a lot of our clients have the maintenance cycle running as a daily occurrence. The logic of this move is that having the defrag occur that often is going to make the database more efficient and thus keep performance up for end users. The trouble is that if you attempt to use any backup solution that scans at the block level you are going to see a lot of change data. The consequence of this is that your backups will take longer than they should because you're sending over all these changed blocks that really aren't new data, but are flagged as such due to the shuffle. More often may not always be better.

A good real world example of this is a customer I had recently. They had a fairly small information store of around 50-60GB and were seeing backup jobs (using the 3X backup appliance) taking as long as 5-6 hours. Upon investigation it was found that each day the Exchange client was transmitting upwards of 4 GB of change data. I worked with the customer to reduce the scheduling down to twice a week over night (not conflicting with the backup window). The results of the change were staggering. After the first day we saw a 20% improvement, and after a week the job was down to 2 hours (60%).

Overall I suggest attempting to run maintenance less often if possible. Smaller deltas should speed up your backup solution, and cause less saturation on your infrastructure from the operation.

Ryan Koch
3X Systems
ryan.koch@3x.com

Friday, March 2, 2012

Highly volatile postgresql

I've had a few clients that have had some issues with postgresql and performance problems taking place over time due to their databases being highly transactional. Mind you these customers are really dealing with a single database that has grown in size, as opposed to several on a single server. It had gotten to the point where my colleague Rich Keggans (from 3X Systems also) had been scheduling a monthly cluster to be run due to how bad the performance would become.

So in response we tried a little experiment involving tweaking the auto-vacuum settings and creating an automated task. I felt the need to share it with you, as we've seen some rather promising results so far as performance degradation seems to have ceased in two instances so far.

For the auto-vacuum we really just made the settings a bit more aggressive. In the case we tested this the customer's database had a very high level of transactions taking place. The chance for bloat to build up here is pretty high so we made the settings reflect the following in order to fight it:

autovacuum = on                         # enable autovacuum subprocess?
                                        # 'on' requires stats_start_collector
                                        # and stats_row_level to also be on
autovacuum_naptime = 1min               # time between autovacuum runs
autovacuum_vacuum_threshold = 250       # min # of tuple updates before
                                        # vacuum
autovacuum_analyze_threshold = 150      # min # of tuple updates before
                                        # analyze
autovacuum_vacuum_scale_factor = 0.2    # fraction of rel size before
                                        # vacuum
autovacuum_analyze_scale_factor = 0.1   # fraction of rel size before
                                        # analyze
autovacuum_freeze_max_age = 200000000   # maximum XID age before forced vacuum
                                        # (change requires restart)
autovacuum_vacuum_cost_delay = -1       # default vacuum cost delay for
                                        # autovacuum, -1 means use
                                        # vacuum_cost_delay
autovacuum_vacuum_cost_limit = -1       # default vacuum cost limit for
                                        # autovacuum, -1 means use
                                        # vacuum_cost_limit

So as you can see we changed a couple values by a small amount in order to make it more aggressive. Paired with this I wrote a quick one line script that would run Analyze. The analyze should update the statistics for the table which makes postgresql's rather effective query planner work at its best. The following one liner is the script, which I had put into /sbin/:

 psql -c "analyze" -q -S -d boxicom -U boxicom > /usr/vault/log/pganalyzetask.log

This was paired with an entry in the crontab using crontab -e:
*   4,20   *   *   * /sbin/pganalyzetask

In this case I picked 4am and 8pm due to the fact that the customer had constant activity during normal business hours and again during a certain period at night. This ideally is going to update the stats after those periods allowing his scripts to perform well on each subsequent time period. 

Further tweaking is going to be required to get these servers running just right, but this is a start anyway. I'll likely be diving back into the postgresql.conf file to see what other changes we can make (based on the hardware available of course). Hopefully we'll continue to see performance improvements on these postgresql databases.

Thursday, February 23, 2012

Postgresql corruption

I've had a couple of Postgresql corruption problems I've been working through lately so I figured I'd share some method so that you don't have to go through the trial and error process I did in getting to the bottom of it. The first thing you have to do is figure out exactly where the corruption is, and what sort of corruption you have. Most of the time corruption is going to be do to an errant action by the admin, or hardware conditions, or a corrupt index in your table.

So first figure out where in your table the corruption is. You can do this using a select query and using the ctid value to figure out where it begins. You will want to set the following two options when doing this:

=>\set FETCH_COUNT 1
=>\pset pager off

Next we will want to run the query itself a sample of this would be as follows:

=>select ctid, * from table;

This will scroll and scroll until you hit the nasty portion where it will crash the instance. Once this occurs you can start to narrow down the affected area. You may wish to attempt a reindex first before you continue on, to make sure that the corruption just isn't a bad index.

=>reindex table tablename

The next step if the reindex doesn't work it is likely you'll need to 'cut out the bruise'. The first thing you can try is a query to delete the values based on the ctid with something like the following:

=> delete from table where ctid >= '(12312,0)' and ctid < '(12313,0)'

This may fail with an error message similar to:

ERROR:  could not open segment [n] of relation [x]/[y]/[z] (target block [b]): No such file or directory

If that occurs we are going to have to zero out the block ourselves. To do this we can use the dd utility.
First lets take a look at the file in question which we can do using a command similar to:

dd if=data/postgresql/base/x/y bs=8192 skip=17897 count=1 | hexdump -C | less

The values in 'if=<value>' are going to match up as base/y/z (with the y and z being from the error message above). The value in 'skip=<number>' is going to match the first value in the page ctid we discovered as corrupt earlier. You will likely see some junk data in here such as a file name written in or a time stamp or what have you. To fix this we are merely going to write an 8k block in at that page as it would be rather unlikely that we could recover rows at this point. To do this we'll use the following:

dd if=/dev/zero of=data/postgresql/base/x/y bs=8192 seek=17897 count=1 conv=notrunc

And now if you run a query looking in that page you'll find a count of zero rows. Now you should be able to do a successful pg_dump.

Ryan Koch
3X Systems
ryan.koch@3x.com

Tuesday, February 14, 2012

Own your data

Through my relatively short IT career I've seen the rise of this thing that is referred to as the 'cloud'. It's spoken about as if some monolithic being that provides you the wonderful content your consume on your PCs, or use to conduct business. The reality of the thing as significantly more complex and drastically more piecemeal and important. We've entered a new time where we can centralize our infrastructures in such a way that the user experience is seamless, and our workload is reduced dramatically. With that have come a large and varying number of technologies claiming to be the best at backing up your infrastructure and your clients. Some have started to migrate their data to the 'public cloud' in order to protect themselves from disasters and the like. This is a respectable aim as having data off site is really the best way to go, but they are also handing over their mission essential data to a third party who may or may not be reliable, much less trustworthy. Having your own private cloud doesn't have to be difficult, and it doesn't have to be expensive.

It's important to own your data. I cannot stress this enough. The documents your users store, the records that keep your business going, and the power points your executives display they are all vital to the survivability of your business. You really shouldn't trust data of that kind of importance to some distant data center that isn't truly accountable to you. If you wanted to pull your data, or perhaps virtual infrastructure you've placed there down the road, how cooperative are they going to be? Even worse, what if the public infrastructure goes down? I don't know if you recall but Amazon's cloud service got hit with 11 hours of downtime or limited usage. While the data was in itself safe access to it was cut off.

There are a few solutions out there that can allow you to accomplish a sufficient backup strategy, and without relying on the public cloud. A lot of where to go depends on what sort of infrastructure you have, and what you are looking to back up. Do you have a Hyper-V or ESX(i) set up? Do you have a lot of windows clients, and some windows servers? How big is your infrastructure?

If you are using primarily windows based computers and servers, and/or you are using Hyper-V I might humbly suggest the product I work on for a living. The 3X Backup Appliance is your private cloud right out of the box. You can do file and system level backups for windows machines, and even do VM level backups of Hyper-V.  Other than touching the product every day, why do I think it works so well for the private cloud? It's easy to use, requires little maintenance, and features some very effective deduplication.

What ever solution you decide to go with, please do take heed to the plea to 'own your data'. 43% of businesses lose important data due to not having a proper backup strategy. Don't be one of those. At the end of the day your clients will appreciate it, you will be protected, and your data will be safe and accessible. If you have any questions at all about our solution or any others feel free to comment here, email me at ryan.koch@3x.com, use #3XSystems on Twitter, or check out our new Reddit Community.

Monday, February 13, 2012

Tasker and an announcement

Before we get into the meat of this post (Tasker) I'd like to share some 3X Systems related news. From here on you can get answers to questions and quick support via the hash tag #3xsystems on Twitter. You'll get a response from either @3XSystems or myself @Ryan_Koch. And if that isn't enough, we have also created a subreddit on Reddit you can use to discuss any issues or questions you have, which can be found here: http://www.reddit.com/r/3xsystems.

So I imagine if you are an Android user that likes to tinker around a bit you may be aware of an application called Tasker. If you aren't aware Tasker is an application that allows you to create automated tasks based on profiles you create. The limits to this application are limited only by your imagination and skill set. While it's been around for a while I wanted to prod at yet further awareness of it (because it's simply amazing) and share a couple of the recipes I'm using.

Recipe #1 : Arriving at work

When I arrive at work Tasker picks up via network location that I'm within a KM of the building. I've set the radius this large because net location is rather bad with accuracy and I don't want to destroy my battery by leaving GPS turned on all the time. The simple view of the profile shows the location variable which is 'Work' and a task called 'Wifi On'. The wifi task does two different things for my benefit. The first of these is that it turns on wifi (one less thing to do once at the desk) and the second thing it does is launch the application AirDroid, which is a pretty cool application that can manage your phone from a web browser (assuming you are on the same wifi network). When I leave the acceptable radius the task exists and runs the exit task called 'wifi off' which in this case turns wifi off and kills the AirDroid application.


Recipe #2: Meeting Mode


This recipe puts the phone into a 'Meeting Mode' when you press a custom shortcut key, and then brings the phone out of said mode when a separate shortcut key is pressed. The Meeting Mode automatically rejects phone calls and sends a notification SMS to the caller, and silences the ringer and notification sound. In this screen capture the coffee cup is the meeting starting, and the space ship is exiting the meeting. When you press the meeting start short cut Tasker sets a variable called %Meeting to 1. Which leads to the a profile that is activated when %Meeting matches '1'. There is then a corresponding task called 'Meeting Mode'. All this task does is set the ringer and notification mode to level 0 or muted more or less.

The profile is then paired with another that automatically sends all calls to voicemail, and sends an SMS message to the caller proclaiming that I was in a meeting. The profile uses a similar logic to know when to kick off but it differs with the entrance of the call event.This happens by setting a task to make use of the SendSMS function in tasker and using the %CNUM variable to pull the 'last called number (in).'


Recipe #3: Custom Alarm

This one is a favorite of mine as it wakes me up in a way I don't detest too much. The customer alarm uses both a time and day context on the profile in order to define when it goes off. In my case I have it set up for weekday mornings. You can set it up to only run for a specified amount of time, and since I'm some what kind to the half asleep version of me I set it to run for 3 minutes. The profile runs a task called 'morning' which does the following:

1. Sets the system volume all the way up
2. Sets the media volume all the way up
3. Uses the text to speech engine to say "Good Morning Ryan, I.T. Like a champion today"
4. Use the music application to start playing the song of my choice
5. Load the music application so I can stop the song if I so choose


I definitely suggest giving this application a look, as it only costs $6.49 and is more than worth it. Between the various amount of playing around one can do, and the convenience of automating some tasks it is just simple hard to justify passing up.